How to Clean and Maintain Your Ninja Creami

This post contains affiliate links. If you make a purchase through these links, we may earn a small commission at no extra cost to you.
The 3-Minute After-Every-Use Routine
The single most important thing you can do for your Creami's longevity is clean it immediately after each use. Ice cream residue that dries on the blade, pint, and outer bowl becomes significantly harder to remove and can harbor bacteria. A quick 3-minute cleanup right after processing keeps everything in excellent condition.
Step 1: The Blade (30 seconds)
Remove the outer lid, lift out the pint, and carefully remove the blade assembly by twisting it counterclockwise. The blade is sharp, so handle it by the center shaft, not the cutting edges. Rinse under warm running water immediately. Most residue slides right off when the ice cream is still soft. If anything sticks, use your thumb or a soft sponge to wipe it clean. Do not put the blade in the dishwasher. The high heat and harsh detergent dull the cutting edges over time, which makes the blade less effective at processing frozen bases.
Step 2: The Pint (30 seconds)
If you are saving leftover ice cream, snap the storage lid on and put it back in the freezer. If the pint is empty, rinse it under warm water immediately. A bottle brush reaches the bottom easily and removes residue that your hand cannot reach. The pint is technically dishwasher safe (top rack), but hand washing is faster and prevents the gradual clouding that dishwasher detergent causes on clear plastic over time.
 OXO Good Grips Bottle BrushFlexible-neck brush that reaches the bottom of Creami pints
View on Amazon →
Step 3: The Outer Bowl and Lid (60 seconds)
The outer bowl catches any overflow during processing. Wipe it out with a damp cloth or rinse under warm water. The outer bowl lid (the piece that locks onto the machine) should be wiped clean, paying attention to the rubber gasket that seals against the outer bowl. Dried residue on this gasket can prevent a proper seal, which affects processing quality.
Step 4: The Motor Base (30 seconds)
Never submerge the motor base in water. Never run it under the faucet. Wipe the outside with a damp cloth. If any ice cream dripped down during processing, wipe it up before it dries. The motor base is the one component that can be permanently damaged by water exposure, so keep it dry.
Deep Cleaning: When the Quick Routine Is Not Enough
Every few weeks (or sooner if you notice buildup), do a deeper clean on each component.
Stained Pints
Berries, turmeric, and food coloring can stain the clear plastic pints. This is cosmetic, not a hygiene issue, but if it bothers you, make a paste of baking soda and water and rub it on the stains with a soft cloth. Let it sit for 10 minutes, then rinse. Most stains lighten significantly or disappear completely. For stubborn stains, soak the pint in a mixture of 1 tablespoon of bleach per quart of water for 30 minutes, then wash thoroughly.
Prevent stains by rinsing pints immediately after use. Most staining happens when colored residue dries on the plastic. A quick rinse right after processing prevents 90% of staining.
Cloudy Pints
Over time, pints develop a cloudy or frosted appearance, especially if washed in the dishwasher frequently. This is caused by micro-scratches from dishwasher detergent abrasives and hard water mineral deposits. It does not affect function or safety, but if you want to maintain clear pints, hand wash them.
Blade Deep Clean
The blade assembly has crevices where residue can accumulate, especially around the base of the cutting arms and the center shaft. Use a small brush (an old toothbrush is perfect) to scrub these areas with warm soapy water. Rinse thoroughly and dry completely before reassembling.
Inspect the blade for chips or damage while cleaning. A chipped blade can still process, but it may create uneven results and the rough edge could damage the pint over time. Replace the blade if you notice chips or significant wear.
Outer Bowl Gasket
Pull the rubber gasket out of the outer bowl lid (it is removable on most models) and wash it separately with warm soapy water. Dried ice cream residue under the gasket is the most common cause of an imperfect seal, which can cause the lid to not lock properly. Clean the gasket channel in the lid as well. Reinstall the gasket once everything is dry.
What Is and Is Not Dishwasher Safe
Dishwasher Safe (Top Rack Only)
- Pint containers
- Storage lids
- Outer bowl lid (remove gasket first)
Hand Wash Only
- Blade assembly (dishwasher dulls it)
- Outer bowl (large size makes it easier to hand wash anyway)
- Motor base (never submerge in water — wipe with damp cloth only)
Storage Best Practices
When Not in Use for Extended Periods
If you are putting the Creami away for a season (unlikely, but it happens), clean everything thoroughly and dry completely before storing. Store with the outer bowl lid slightly ajar rather than sealed. Sealing a slightly damp machine in a cabinet creates the conditions for mold growth.
Store pints with their lids off. A sealed pint with even a tiny amount of residue inside will develop an odor over time. Pints stored open and dry stay fresh indefinitely.
Motor Base Placement
Keep the motor base on a flat, stable surface away from the edge of the counter. The Creami vibrates during processing, and a unit too close to the edge can walk itself off the counter over many uses. Leave a few inches of clearance on all sides for ventilation.
Troubleshooting Common Issues
The Lid Will Not Lock
The most common cause is dried residue on the outer bowl rim or the gasket. Clean both surfaces and try again. If the lid still will not lock, check that the pint is fully seated in the outer bowl and that the blade assembly is properly installed. A pint that sits slightly crooked prevents the lid from engaging.
The Machine Sounds Different Than Usual
A grinding or rattling sound during processing can mean the blade is hitting something it should not. Stop the machine and check for a loose pint (the pint is not seated properly), a damaged blade, or a mix-in that was too large and jammed the blade. Remove the obstruction and try again.
A louder-than-usual motor sound can mean the base is particularly hard (common with low-fat or protein bases). This is normal. The motor is working harder to process the denser base. If it persists across multiple uses with different bases, contact Ninja customer support.
Ice Cream Leaks During Processing
A small amount of liquid around the pint during processing is normal, especially with softer bases or bases that contain alcohol. If you see a significant leak, the pint may be cracked (inspect for hairline cracks along the bottom edge) or the outer bowl gasket may not be sealing properly.
The Machine Stops Mid-Cycle
The Creami has thermal protection that stops the motor if it overheats. This usually happens when processing multiple pints back-to-back without allowing the motor to cool. Wait 10-15 minutes between pints if you are processing more than 3 in a row. The machine will restart normally once the motor cools.
Replacement Parts
The blade assembly is the only part that wears out with regular use. Expect to replace the blade after 1-2 years of heavy use (processing 5+ pints per week) or 3-4 years of moderate use. A dull blade is noticeable because your ice cream becomes progressively less smooth and needs more Re-Spins to achieve the same texture. Fresh blade, fresh results.
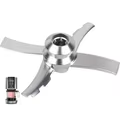 CREAMi Replacement Paddle Blade (NC300 Series)Stainless replacement blade for NC300-series machines — restore like-new smoothness
View on Amazon →
Extra pint containers do not wear out but can crack if dropped or if the plastic becomes brittle from extensive dishwasher use. Keep a few extras on hand so a cracked pint does not interrupt your ice cream routine.
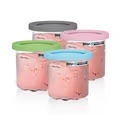 Ninja CREAMi Pint Container 4-PackOfficial Ninja pints with color-coded storage lids
View on Amazon →