Creami Ice Cream Cakes at Home
Why Ice Cream Cakes Work So Well with the Creami
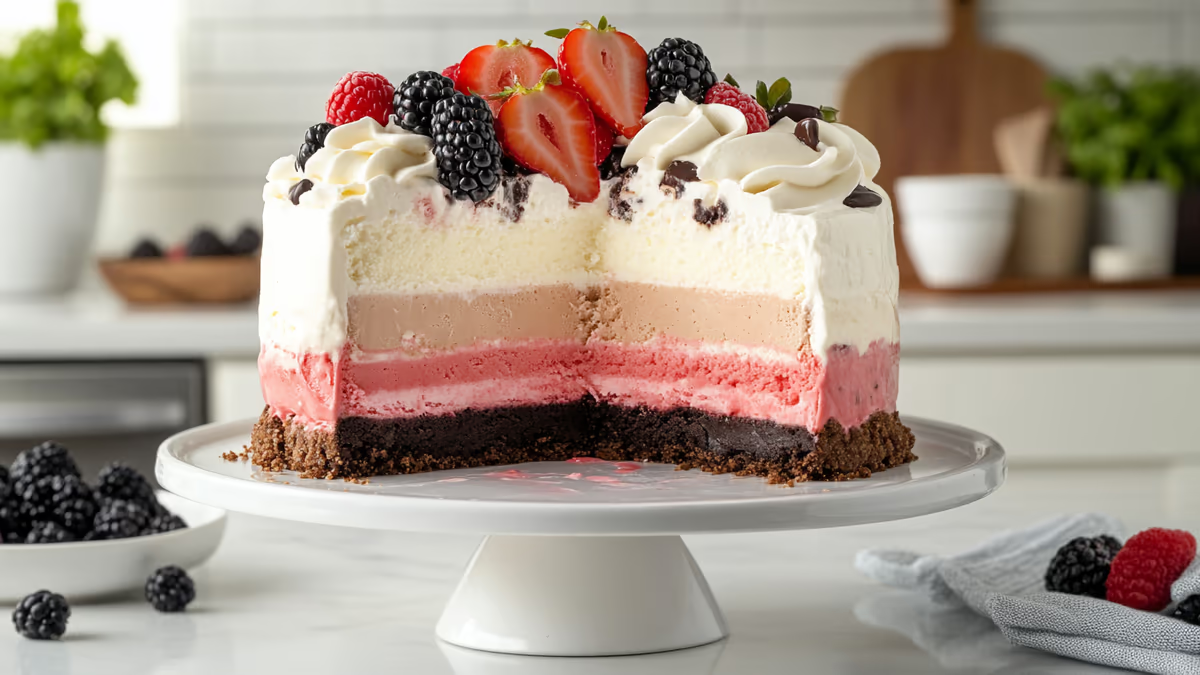
Ice cream cakes are one of the most impressive desserts you can bring to a party, and the Ninja Creami gives you a huge advantage over store-bought versions. You control the flavors, the layers, and the quality of every ingredient. A homemade ice cream cake with real strawberry ice cream, a fudge ripple, and a crushed Oreo base beats anything from a bakery freezer case.
The Creami is especially well-suited for ice cream cakes because it produces a denser, less airy ice cream than commercial machines. This density is exactly what you want in a cake. Airy commercial ice cream melts fast when sliced, leaving you with a puddle on the plate before guests can take their first bite. Creami ice cream holds its shape, slices cleanly, and gives you time to serve everyone before anything melts.
The other advantage is customization. Want a birthday cake with chocolate and strawberry layers? Done. A holiday cake with peppermint and dark chocolate? Easy. An anniversary cake with champagne sorbet and vanilla bean? No problem. Every ice cream cake starts with the same simple technique, and the flavor possibilities are limited only by how many pints you are willing to freeze.
Equipment You Need
The Pan
A 9-inch springform pan is the best choice for ice cream cakes. The removable sides let you unmold the cake cleanly without flipping it upside down. Line the bottom and sides with plastic wrap before building, leaving several inches of overhang. This creates a smooth surface and makes removal foolproof.
If you do not have a springform pan, a standard 9-inch round cake pan works. Line it with plastic wrap with plenty of overhang so you can lift the entire cake out once frozen. A loaf pan creates a rectangular ice cream cake that slices into elegant individual portions.
Other Tools
- An offset spatula for spreading ice cream layers smoothly
- Plastic wrap for lining (use two overlapping pieces for full coverage)
- A hot knife or a knife dipped in warm water for clean slicing
- A cake turntable is helpful but not required
Building the Layers
Layer 1: The Base
Every great ice cream cake starts with a crunchy base. This is what gives the cake structure and provides textural contrast to the creamy ice cream above.
Oreo base: Crush 20 Oreos (with the filling) in a food processor until fine. Mix with 3 tablespoons of melted butter. Press firmly into the bottom of the lined pan. Freeze for 15 minutes to set.
Graham cracker base: Crush 1.5 cups of graham crackers. Mix with 1/4 cup sugar and 4 tablespoons melted butter. Press into the pan. Freeze 15 minutes.
Brownie base: Bake a thin batch of brownies in a 9-inch pan. Let cool completely, then place the brownie round in the bottom of your lined springform pan. This creates a fudgy, chewy layer that is incredible with vanilla or mint ice cream.
Layer 2: First Ice Cream Layer
Process your first pint in the Creami and immediately (while it is soft) spread it evenly over the base using an offset spatula. Work quickly because the ice cream starts firming up within minutes. If it gets too firm before you finish spreading, run the spatula under warm water and try again.
Aim for a layer about 1 inch thick. This uses roughly one full pint for a 9-inch pan. Once the layer is even, cover with plastic wrap and freeze for at least 1 hour until completely firm. Do not skip this step. If the first layer is not frozen solid, the second layer will mix into it.
Layer 3: The Middle Crunch
This is the layer that makes homemade ice cream cakes special. A thin layer of texture between the two ice cream layers adds crunch, flavor, and visual interest when the cake is sliced.
Options:
- Hot fudge (slightly cooled so it does not melt the ice cream below)
- Crushed cookies, candy bars, or pretzel pieces
- A thin layer of caramel sauce
- Peanut butter spread thinly
- A layer of crushed freeze-dried fruit
- Cookie butter or Nutella
Spread the crunch layer thinly and evenly over the frozen ice cream. It does not need to be thick, just enough for a visible stripe in each slice. Freeze for 20 minutes if using a sauce to let it firm up.
Layer 4: Second Ice Cream Layer
Process your second pint and spread it over the crunch layer. Same technique as the first: work quickly, use an offset spatula, and aim for an even 1-inch layer. Cover with plastic wrap and freeze overnight (at least 8 hours) until completely solid throughout.
Layer 5: Topping and Decoration
The top layer is what people see first, so this is where presentation matters. Unmold the cake by releasing the springform sides (or lifting it out using the plastic wrap overhang) and transferring to a serving plate.
Decoration options:
- A layer of whipped cream piped around the edges and top
- A drizzle of chocolate ganache, caramel, or berry sauce
- Fresh fruit arranged in a pattern
- Crushed cookies or candy sprinkled around the base
- Chocolate shavings made with a vegetable peeler
- A ring of piped whipped cream rosettes
Flavor Combinations That Work
Classic Birthday Cake
Base: crushed Oreos. Layer 1: vanilla bean ice cream. Crunch: hot fudge + crushed Oreo pieces. Layer 2: chocolate ice cream. Top: whipped cream, sprinkles, candles.
Strawberry Shortcake
Base: crushed vanilla wafers. Layer 1: strawberry ice cream. Crunch: sliced fresh strawberries + strawberry sauce. Layer 2: vanilla ice cream. Top: whipped cream, whole strawberries.
Brownie Sundae
Base: thin brownie layer. Layer 1: chocolate ice cream. Crunch: caramel sauce + chopped peanuts. Layer 2: vanilla ice cream. Top: hot fudge drizzle, whipped cream, cherry.
Cookies and Cream Dream
Base: crushed Oreos. Layer 1: cookies and cream ice cream (vanilla base + crushed Oreos as mix-in). Crunch: more crushed Oreos + white chocolate drizzle. Layer 2: chocolate ice cream. Top: whipped cream, Oreo halves standing upright.
Tropical Paradise
Base: crushed graham crackers + toasted coconut. Layer 1: mango sorbet. Crunch: toasted coconut flakes. Layer 2: coconut ice cream. Top: fresh tropical fruit, lime zest.
Make-Ahead Timeline
Ice cream cakes are the ideal make-ahead dessert. Here is the schedule:
- 3-4 days before: Make all ice cream bases and freeze in pints
- 2 days before: Build the cake layer by layer (allow 1 hour between each ice cream layer for freezing, plus overnight for the final freeze)
- Day of serving: Unmold and decorate 15-20 minutes before serving. The cake needs 5-10 minutes at room temperature to soften enough for clean slicing.
A fully assembled ice cream cake keeps for up to 2 weeks in the freezer if wrapped well in plastic wrap and then foil. The base may soften slightly over time, but the ice cream layers remain perfect.
Slicing Tips
The single biggest factor in clean slices is the knife. Run a large chef's knife under very hot water for 10 seconds, wipe it dry, and make one clean downward cut. Dip and wipe the knife between every slice. Do not saw back and forth, just press straight down. The hot blade melts through the ice cream cleanly and the result looks professional.
If the cake is too hard to cut, let it sit at room temperature for 5-8 minutes. If it is too soft, put it back in the freezer for 10 minutes. The sweet spot is when you can press a finger gently into the surface and leave a slight indent.
Cut the entire cake at once rather than cutting slices one at a time. This is faster and lets you distribute pieces to guests before anything melts. For a 9-inch round cake, cut in half, then quarters, then eighths for 8 generous slices.